PROJECT 1: I have been wanting to get some canvas pictures made for quite awhile. But, I was a bit stuck on the fact that a.) they are expensive b.) once you create it, you are stuck with that picture. So you better love the picture you choose.
So, I've dragged my feet a bit on getting them made. As I was scanning over ideas on pinterest, I came upon a DIY canvas picture! Here's how you do it....
1.) Buy a canvas at any crafting store. At Michaels, they had an awesome deal. Buy a pack of 2 and get a pack of 2 free. I believe the pack of 2 was about $10. So, I got 4 for $10! The size I chose was 11x14.
2.) Paint the edges of your canvas with your desired color. I was doing black and white pictures so I chose black. I also saw on pinterest that you can use scrapbook paper for the edges. I thought about this but realized I really struggle cutting straight lines! Painting was much easier! (I forgot to take a picture of this step!)
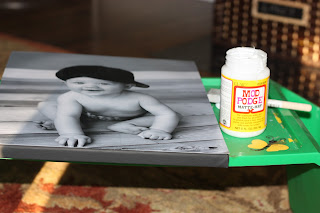
4.) Use Mod Podge and seal the picture to the top of the canvas. (Mod Podge dries clear so you don't have to be overly careful.) I used the matte finish.
5.) Take the Mod Podge and cover the picture. Use smooth, neat strokes. It will give the picture a nice matte finish.
5.) Let it dry. You have a fantastic canvas picture that is easy to hang in no time! It's quick, easy, and CHEAP!!! DIY version approximately $10!
Project #2: In addition to obsessing over pinterest.com, I am also obsessed with reading other people's blogs. The blogs I've been most into these days are from people that have vintage/antique shops or people that specialize in DIY projects for the home. One very cool blog that I read is Maple and Magnolia. The author has an old farmhouse and an amazing sense of decorating style. She was actually just featured in Woman's Day Magazine. She visits many of the antique shops in my area and comes up with really cool ways of using some of the things. I always kick myself when I see an item I've looked at that she's purchased and used in a cool way. I always think, "Why didn't I think of that!?!?" One of her new "obsessions" is silhouettes. At first I thought it was a bit strange. But, then I saw one of the projects she did. Coincidentally, I also saw LOTS of silhouettes being displayed on pinterest. So, I decided I would give it a whirl.
Here's how to do it....
1.) But a piece of wood at your local craft store. I chose 5x7 pieces in various shapes. I did various shapes so I can always add to my collection and not have to match.
2.) Buy a cool piece of scrapbook paper to put on as the face of your picture. I chose white with a vague design. Paint your piece of wood white. I decided to add black around the edge to make it "pop." I like the look, but it was very difficult to paint a straight line.
3.) Use your Mod Podge (This is by far my new favorite crafting material... move over spraypaint!) to adhere the paper to the piece of wood.
4.) Take a profile picture of your subject. I am making silhouettes of my kids. Print the desired size of your picture onto paper (thicker paper works best.)
5.) Cut out the outline of your subject's head. Paint the picture black.
6.) Use your Mod Podge and adhere it to the wood. You may choose to write something under the picture. I wrote, "Lucas Matther ~ 6 Months." (NOTE: Use permanent marker or it will bleed). Then, use smooth, even strokes and paint over your picture and paper.
WAH-LA! You have a cool silhouette of your kids!


No comments:
Post a Comment