Tuesday, November 29, 2011

Oh, Bite Me


And that's just what he did.... BITE ME!

This little rebel now has 2 bottom teeth and knows how to use them!  Breastfeeding is getting more and more terrifying.  He literally bites me at EVERY feeding. He drinks for a bit- looking all angelic.  And then, something comes over him.  He clamps down and pulls!  I scream. He smiles.  It's becoming a bit of a ritual. 


Friday, November 25, 2011

Mr. Fix-it and Mrs. Craftypants... Pinterest Project #3

My parents came to our house for Thanksgiving. They certainly aren't the type to just sit and relax. They like to go, go, go... or maybe I should say do, do, do! My Dad literally brought a car full of tools so that he could fix "stuff." He fixed more in 48 hours than we've done in the last 2 years.  He fixed our falling down fence/gate, retarred some of our roof, hung storm windows, snaked a toilet, fixed doorknobs, unclogged a sink, hung a towel rack, and fixed lights that even an electrician said he couldn't fix. I'm sure I'm missing some things too! 

My Mom is extremely talented. She doesn't give herself enough credit. She is quite artsy and creative.  I knew that if there was a Pinterest project I wanted to do, she would be all for it! I chose to make "simple" Christmas tree cones.  Together, we went to the fabric store, bought our few simple supplies and were off to craft. I pulled up my "pin" on pinterest and read the directions.  Neither one of us are keen on reading and following written directions.  In fact, we both became very frustrated! There was quite a bit of measuring and folding that was included in the directions. After much frustration, a few swear words, and some crumpled poster board we FINALLY figured it out. We also figured out that all of the measuring was NOT needed.  All the directions should have said was "Cut your posterboard into a half circle in order to make a cone."  DONE. 

I must admit, my frustration got the best of me and I had to "take a break and take care of the kids." Luckily, my mom stuck with it and completed the fabric step of the project.  I think they turned out great.... just don't look too closely! ;-) 

Cone complete

Covering in fabric... this is when I had to "take care of the kids."

Finished project!

Thankful

I am so thankful.

Thanksgiving at our house.... with my parents.

I am thankful for my parents.

I am thankful that my children have such a wonderful Mimi.

I am thankful for my children.
I am thankful for my dad... and him being Mr. Fix-it!

I am thankful for my Mom... and her being so crafty!

I am thankful for my husband... and him being such a great cook!

I am thankful for Miss Mya!
I am thankful for Luke the Duke.


I am thankful for all of our friends and family. I am truly blessed.

Tuesday, November 22, 2011

half

I can't even believe it! Lukey is 6 months old! I'm not sure how it's even possible that he is half way to his 1st birthday!

He continues to be good natured the majority of the time! I always say, if I was crazy enough to consider a third baby, he would make be do it! But... lucky for me... I'm not crazy! ;-)

Here are his stats:

Weight: 18 lbs. 5 oz. (70%)
Height: 28.5 in. (96%)
Head: 43 cm

Napping- 3 times a day (usually about 9am, 12pm, 3pm)
Bedtime- Usually around 7:00 and he's JUST started sleeping until 5ish, quick feed and back until 7ish 

Eating- Lukey is still being breastfed but is usually supplemented with a bottle or two during the day.    (I think I'm on the verge of weening him, but mother's (and other's) guilt is stopping me!)
He has started eating rice cereal and some veggies.  Today, we got the go ahead to start table foods.  He tried a tiny bit of guacamole today.  He wasn't so sure about it but ate it like a champ! I think we'll stick to the baby foods for now. Thus far, he's had peas, carrots, and sweet potatoes.  Sweet potatoes are by far his fav!  I have a feeling he is going to be our "eater!" He really hasn't found a food he doesn't like!

Dr. Brown said she feels 2 of his bottom teeth coming in.  So, we look forward to some crankiness and sleepless nights! NOT!

Lukey is really enjoying holding and shaking his toys.  He often "talks" to them. I often wonder what he is trying to tell them! He is also perfecting his sitting up. He does a pretty good job most of the time but occasionally tips over!


My HAPPY boy!


love love love this little guy!

My Handsome Harry... (notice his scratch on his nose his gone! I am practicing with Photoshop!)
Some Snapshots----
Sitting like a big boy!

So proud! (Not a very good quality pic but I loved his expression... taken with my i-phone)


Sharing a meal

PEAS!


Happy Boy! (By the Way... I think he looks JUST like me as a baby! I'll have to find a picture to compare!)

Real Men Wear PINK!

Friday, November 18, 2011

Pinterest Project #1 and #2... COMPLETE

So I, along with the rest of the world, am quickly becoming obsessed with pinterest.com! I spend hours (that I don't have) searching, admiring, pinning, and thinking about all of the DIY projects that I "think" I could so easily do! There are SO many fantastic ideas that it is actually really overwhelming. I created a folder on my desktop called "pinterest ideas."  Within the folder I have folders... it really is quite out of hand.  Earlier this week, I decided on 2 projects that I wanted to do. I'm not sure why out of the millions of ideas I chose these, but I did. So, after a trip to Michaels and a quick stop at Costco I was ready to DI-Myself!


PROJECT 1: I have been wanting to get some canvas pictures made for quite awhile. But, I was a bit stuck on the fact that a.) they are expensive b.) once you create it, you are stuck with that picture. So you better love the picture you choose.

So, I've dragged my feet a bit on getting them made.  As I was scanning over ideas on pinterest, I came upon a DIY canvas picture!  Here's how you do it....

1.) Buy a canvas at any crafting store.  At Michaels, they had an awesome deal. Buy a pack of 2 and get a pack of 2 free. I believe the pack of 2 was about $10.  So, I got 4 for $10!  The size I chose was 11x14.


2.) Paint the edges of your canvas with your desired color. I was doing black and white pictures so I chose black.  I also saw on pinterest that you can use scrapbook paper for the edges. I thought about this but realized I really struggle cutting straight lines! Painting was much easier! (I forgot to take a picture of this step!)


3.) Get your desired picture enlarged to the correct size. Costco prints 11x14 for $2.99.


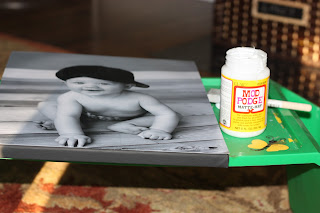
4.) Use Mod Podge and seal the picture to the top of the canvas. (Mod Podge dries clear so you don't have to be overly careful.) I used the matte finish.

5.) Take the Mod Podge and cover the picture. Use smooth, neat strokes.  It will give the picture a nice matte finish.

5.) Let it dry.  You have a fantastic canvas picture that is easy to hang in no time! It's quick, easy, and CHEAP!!! DIY version approximately $10!


Project #2: In addition to obsessing over pinterest.com, I am also obsessed with reading other people's blogs.  The blogs I've been most into these days are from people that have vintage/antique shops or people that specialize in DIY projects for the home.  One very cool blog that I read is Maple and Magnolia.  The author has an old farmhouse and an amazing sense of decorating style. She was actually just featured in Woman's Day Magazine. She visits many of the antique shops in my area and comes up with really cool ways of using some of the things.  I always kick myself when I see an item I've looked at that she's purchased and used in a cool way. I always think, "Why didn't I think of that!?!?"  One of her new "obsessions" is silhouettes. At first I thought it was a bit strange. But, then I saw one of the projects she did.  Coincidentally, I also saw LOTS of silhouettes being displayed on pinterest.  So, I decided I would give it a whirl. 

Here's how to do it....

1.) But a piece of wood at your local craft store. I chose 5x7 pieces in various shapes. I did various shapes so I can always add to my collection and not have to match.


2.) Buy a cool piece of scrapbook paper to put on as the face of your picture. I chose white with a vague design.  Paint your piece of wood white.  I decided to add black around the edge to make it "pop." I like the look, but it was very difficult to paint a straight line.


3.) Use your Mod Podge (This is by far my new favorite crafting material... move over spraypaint!) to adhere the paper to the piece of wood.


4.) Take a profile picture of your subject. I am making silhouettes of my kids. Print the desired size of your picture onto paper (thicker paper works best.) 


5.) Cut out the outline of your subject's head. Paint the picture black.


6.) Use your Mod Podge and adhere it to the wood. You may choose to write something under the picture. I wrote, "Lucas Matther ~ 6 Months." (NOTE: Use permanent marker or it will bleed). Then, use smooth, even strokes and paint over your picture and paper.


WAH-LA! You have a cool silhouette of your kids! 


Tuesday, November 15, 2011

My Team on Halloween

I'm a little behind on posting and a lot tired!

So, here are some pictures from Halloween with just a few words to accompany! ;-)

Halloween at Mya's Preschool

Go Mya Go!


Mya with Mrs. Eccles and Mrs. Christy- They were a peanut butter and jelly sandwich. They had "bread" strapped to their backs so when they hugged they made the sandwich... so cute!

Can you find Mya?  Yes, she is the one towering over the rest!

I'm "co-head- room mom"  Who knew this was so political? I am use to being the teacher with NO room moms! So, I volunteered.  Apparently, NOT getting selected as room mom is a BIG deal!

Here are the cute snacks we made-
Worm Sandwiches (Nilla Wafers, chocolate frosting, and gummy worms) 
Fingers (cheese sticks and twizzlers)!

More fingers! The kids were clueless! For an adult party... use a hotdog (finger), red pepper (nail), and ketchup (blood) 

Trick-or-Treating
The kids and I went trick-or-treating with our neighbors, The Goldbergs, because Matt had to work.  Mya was timid at first but soon got the hang of it! Lukey was just along for the ride!

My little football player!

Cheerleader Mya with Spiderman Aiden

This was seriously the Halloween that never ended. 

On the Saturday before Halloween, we had a small get together at our house. 
No costumes, just food, friends, drinks, and smores!

Friday, November 11, 2011

You're Breaking My Heart....

Oh Cecilia....

I was FINALLY able to meet my bff Kristy's baby girl Cecilia.  I can't help but break into the song when I see her! She is a beauty....looks just like her Momma! 

I left Mya at home and headed to Brittany's to meet the little lady! It was a nice break to have just Luke with me! I forgot my camera and honestly didn't think much about taking pictures! We just enjoyed eating, talking, and spending time with our little ones! Next get together, Mya and Izzy will have to join in on the fun!

Here are just a few pictures I captured with my iphone....

l to r.  Cecilia Funk, Ella Korman, Luke Wiegman, Addie Korman

Oh Cecilia... Will you break his heart one day?

My helper... Miss Ella

Monday, November 7, 2011

Mya's First Dentist Visit

Mya had her first visit to the dentist today.  She was a little nervous before arriving, but the staff was so fantastic with her.  Dental Assistant Betty explained every tool she used and talked her through each process.  Dr. Herer was fantastic too! She got her teeth cleaned and was given a "Good" on her Dental Report Card! YAY!